
goldwoven
Mar 2, 2026
From Packaging to Presentation: A Step-by-Step Approach to Using Bamboo Baskets for Memorable Event Gifts
There’s a moment right before an event opens—usually 20–30 minutes out—when everything gets judged at once. The welcome table, the lighting, the little details that either look calm or look rushed. Gift packaging sits right in that spotlight. A woven container earns its keep because it does two jobs without drama: it protects items during transport, and it looks “done” the second it hits the table. That’s why a well-made bamboo basket works so well for gift packaging and event gifting. It carries weight, holds shape, and doesn’t need layers of extra wrapping to feel complete.
Bamboo basket for gift packaging: what it does better than a box
A box is predictable. It stacks. It closes. It also dents, creases, and shows every mistake in a corner. A basket behaves differently. It’s rigid where it counts (base and rim), forgiving where it helps (sides), and visually interesting even before anything goes inside.
Also, a woven container reduces the “packaging tax.” With many boxes, time disappears into making the outside look presentable: tissue, lid alignment, tape lines, stickers, sleeves. With a basket, most of the beauty is already there. A neat liner fold plus one band of ribbon can finish the look in under five minutes.
The structure is the quiet advantage
Gift packaging fails when items move. The fastest way to stop movement is to give the set a frame that resists flexing. A good basket rim acts like a guardrail. A stable base keeps jars from leaning and corners from collapsing.
In practical terms, a basket can take a quick “carry test” before it ever ships. Lift it by the handle, tilt it slightly, then set it down. If items hold their position with only minor shifts in filler, the build is on the right track.
Breathability helps more than expected
Some gift sets are sensitive to trapped moisture. Baked treats can soften. Chocolate can look dull. Even folded textiles can pick up a compressed, stale look. A woven container gives a bit of airflow around the set, which keeps things looking fresher during a multi-hour window.
For on-site gifting, that detail matters. A welcome-table gift often sits out for two to six hours. Airflow buys time without needing special packaging tricks.
The “after-life” is part of the value
Disposable packaging is a one-time cost. A basket keeps being used, which changes how the gift feels. Later, it becomes pantry storage, towel storage, entryway catch-all, or a simple shelf piece.
That’s not just a sustainability point. It’s a usefulness point. When the container becomes an object worth keeping, the whole gift feels more intentional—even if the contents are simple.
A food hamper layout that stays calm
Food sets usually include mixed shapes: boxes, jars, bottles, pouches. That mix can look messy fast. A hamper-style build works because it creates a back row and a front anchor, almost like a small stage.
Notice how the tall items sit behind, while smaller pieces line the front. That single decision makes the set photograph cleanly from a few steps away.
Basket size & capacity guide for event gifting baskets
Basket size is the part that looks boring on paper and causes the most pain on build day. Too small, and labels fight for space. Too large, and filler costs explode and the set looks empty unless it’s packed heavy.
To keep things simple, three sizes cover most event work: small, medium, and large. The ranges below are practical planning numbers, not rigid rules. Still, they help when packing 30+ sets and trying to keep consistency.
Small baskets (quick handoff, tight item list)
Small baskets usually land in the “speaker gift,” “thank-you,” or “room add-on” category. They shine when the item list is short and each piece has a clear role.
Typical use: compact appreciation gifts, desk-friendly sets, quick handoff moments
Good for: tea tins, mini candles, sachets, snack bars, travel-size body care, note cards
Suggested filled weight: 0.8–1.8 kg (about 1.8–4 lb)
Stability tip: add a thin baseboard (1.5–2 mm) under the liner to prevent base sag
If glass is involved—like a small jam jar—lock it in place. A simple trick is a paper “donut”: roll kraft paper into a ring, tape it, and seat the jar inside that ring before adding filler around it.
Medium baskets (the sweet spot for most events)
Medium baskets handle mixed shapes without looking crowded. They also scale well when building 60 or 80 sets because the layout has room to breathe.
Typical use: wedding welcome baskets, hotel room drops, premium conference gifts
Good for: one bottle or tall item + 4–7 supporting items (boxes, jars, pouches)
Suggested filled weight: 1.8–3.5 kg (about 4–7.7 lb)
Stability tip: use a non-slip layer under the liner (thin rubber mesh or textured paper)
For bottles in medium baskets, bracing matters. Place the bottle slightly off-center, then wedge it with two folded tissue “blocks” on either side. That brace prevents the slow lean that ruins photos.
Large baskets (hamper builds, bigger budgets, heavier shipping)
Large baskets look impressive, but they demand discipline. Without a plan, they become a random pile with a lot of filler showing.
Typical use: holiday hampers, VIP gifting, milestone celebrations, press-style sets
Good for: multiple tall items, larger boxed items, heavier jars, curated collections
Suggested filled weight: 3.5–7 kg (about 7.7–15.4 lb), depending on handle strength
Stability tip: consider an insert tray or divider to stop shifting during transport
When glass jars and bottles share a large basket, treat the base like a shipping carton. A flat corrugated baseboard plus a non-slip sheet keeps weight centered. Then add a divider or insert so glass never knocks glass.
Bottom reinforcement: what actually works
Reinforcing the base doesn’t need fancy materials. It needs the right layers in the right order.
Baseboard: thin corrugated sheet or rigid chipboard, cut to fit
Non-slip layer: rubber mesh, drawer liner, or textured kraft
Soft buffer: tissue “blocks” under heavy items
Finish layer: light shred or crinkle only where gaps show
That stack prevents the common failure: heavy items compressing filler until everything slumps toward one corner.
Recommended bamboo gift basket types for events (and why they behave better)
Not every basket shape plays nicely with transport, photos, and fast setup. Certain shapes are just easier to build, especially when multiple sets need to match.
This is where browsing a focused category helps. When the goal is event-ready shapes, the Gift baskets collection is a useful place to compare formats without bouncing across unrelated product pages.
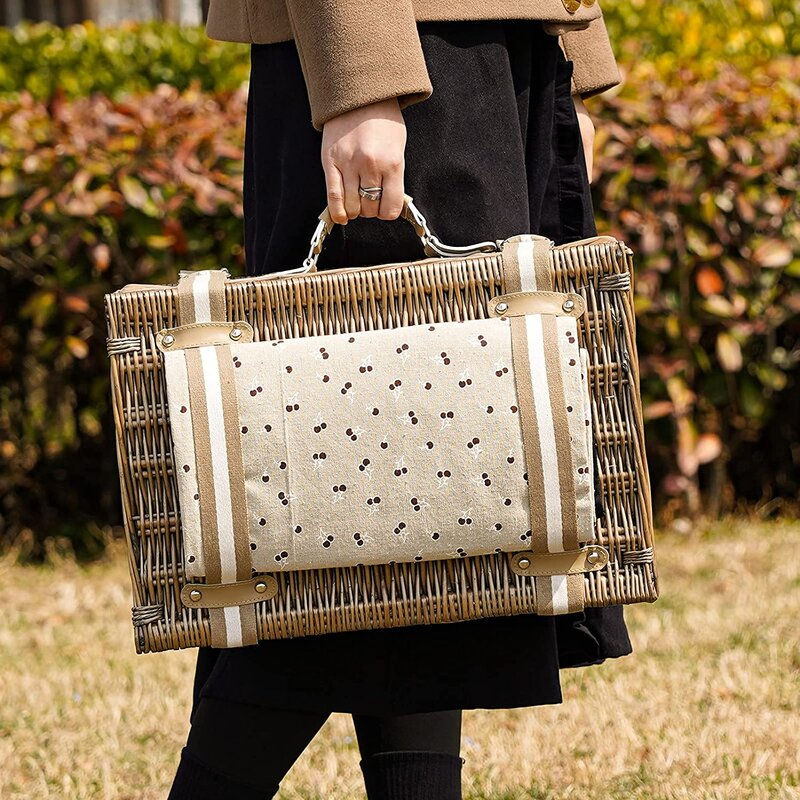
1) Rectangular handled baskets (best for handoffs and welcome tables)
Rectangles look organized. They also pack efficiently in cartons and vehicles. Handles make them easy to carry, but the handle arc needs planning.
Best for: wedding welcome gifting, hotel check-in moments, conference handoffs
Ideal contents: tall bottle + boxed sweets + snack pouches + card
Placement note: keep tall items away from handle squeeze points
Why it works: the straight sides help items align and face forward
A quick build move is to place a tall bottle at the back corner, then brace it with two medium boxes. That “triangle” locks the back row in place.
2) Low-profile tray baskets (best for staging and photography)
Low trays look modern and clean. They also prevent the “tower effect” where items feel like they might topple.
Best for: press gifting, tabletop display, VIP room drops
Ideal contents: candles, skincare tubes, small textiles, two or three boxed items
Placement note: use height variation through risers (hidden boxes under liner)
Why it works: lower center of gravity, easy to photograph from above
For trays, filler should be restrained. A flat liner fold plus a few tucked tissue blocks keeps the look crisp.
3) Medium-depth room-drop baskets (best for hotel rooms and retreats)
Room-drop gifting needs speed. It also needs stability because sets often get carried in batches.
Best for: hotel amenities, retreat welcome gifts, team offsite rooms
Ideal contents: water bottles, snacks, local map card, small self-care item
Placement note: keep the front edge clean so the set reads tidy at a glance
Why it works: enough depth to hide filler while staying easy to carry
A small card tucked behind the back row can do labeling without cluttering the front.
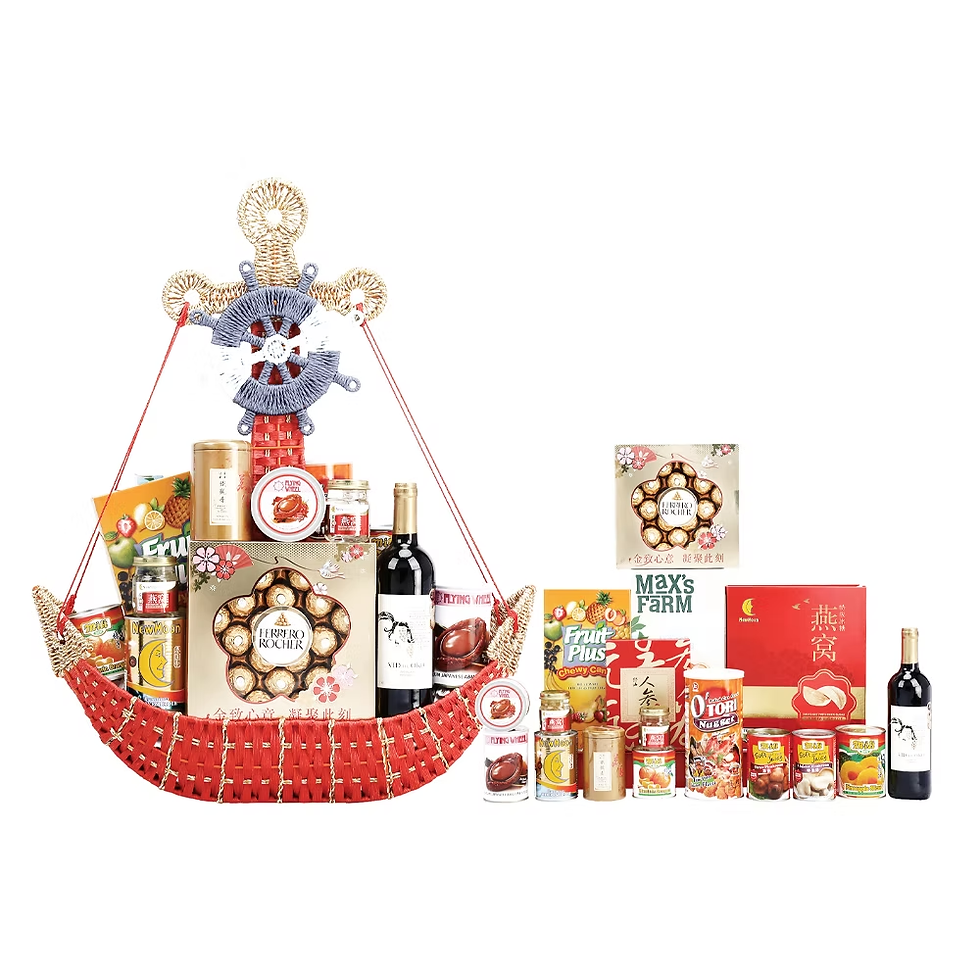
4) Deep hamper baskets (best for holiday and premium builds)
A deep hamper is the classic “wow” shape. It’s also the most likely to go wrong if weight distribution is ignored.
Best for: holiday gifting, milestone events, larger budgets
Ideal contents: multiple boxed foods, one or two bottles, heavier jars
Placement note: heavy items low and centered, never at outer corners
Why it works: deep sides hide structure layers and protect contents
Hamper builds benefit from dividers or insert trays, especially when glass is included.
5) Lidded basket sets (best for shipping and privacy)
Lids make stacking easier and protect sets during transport. They also reduce wind issues at outdoor venues.
Best for: shipped gifting, outdoor events, staged pickups
Ideal contents: mixed items that need protection or a cleaner silhouette
Placement note: keep the lid closure simple—one ribbon band is enough
Why it works: fewer exposed elements, less chance of messy movement
For branded projects, lidded sets also carry customization well. When logo ribbon, custom sizing, or color matching is part of the plan, the Customization options page is the practical reference point for what can be changed without redesigning the whole build.
Building a woven bamboo basket for event gifting that stays stable
A basket can look effortless, but stability is built on purpose. The goal is to stop movement, control the “front view,” and keep the set consistent across batches.
Step 1: Lock the base before anything else
Start with a baseboard cut to fit. Add a non-slip layer on top of that. Then place the liner.
That order matters. If the liner touches the basket base directly, heavy items can slide and polish the base smooth over time. With a grip layer, items stay put even when carried fast.
Step 2: Use the liner like a frame, not a blanket
A liner should show a clean rim line. A simple method is to fold the liner so 3–6 cm is visible above the filler line.
For a neat look, keep corners sharp. Fold, crease, then tuck excess under the baseboard. That tuck stops the liner from creeping upward when heavy items settle.
Step 3: Build “tissue blocks” for structure
Loose shred looks festive, but it compresses under weight. Tissue blocks act like small wedges.
Fold tissue into rectangles, about the size of a paperback book. Place two blocks at the back corners and one block at the front center. Those three pieces create a stable platform without showing.
Step 4: Place the anchor item and brace it
Every basket needs an anchor item. It can be a bottle, a tall tube, a folded textile roll, or a larger box.
Once it’s placed, brace it immediately. Use tissue blocks, folded kraft, or two medium boxes as side supports. A braced anchor prevents the slow “lean” that shows up after transport.
Step 5: Fill the middle with medium shapes, then cap the gaps
Boxes and tins work like bricks. They stack and keep lines straight.
After medium items are placed, finish with small items only where gaps remain. Mini items look charming, but they also create visual noise if there are too many. Two or three is plenty.
Step 6: Finish with one clean detail
A ribbon band, a tag, or a small seal is enough. Too many finishing pieces pull attention away from the weave and make the set look busy.
Outdoor events need one extra check: tag corners. A tiny adhesive dot under the tag’s lower corner stops wind flips without showing tape lines.
A neutral self-care style that photographs well
Neutral palettes are the easiest to batch. They also look calm on crowded tables.

Here, the layout keeps tall bottles in back and heavier items low. The ribbon stays simple, which lets the basket texture do the work.
Batch-building workflow (30 / 80 / 200 sets) that keeps every basket consistent
The real challenge in event gifting is consistency. One basket can look perfect. The next one can look slightly crowded, slightly empty, or slightly tilted. Those small differences shout when 60 sets sit side by side.
The fix is a workflow that treats the build like a repeatable process, not a creative project done 60 times.
Pre-build setup: the “station” approach
Before any baskets get touched, set up stations:
Station A: Sorting — group items into identical piles (one pile = one set)
Station B: Base + liner — cut baseboards and pre-fold liners
Station C: Structure — pre-fold tissue blocks and measure filler depth
Station D: Placement — follow an item map for layout
Station E: Finish + label — ribbon, tags, cards, final wipe-down
Station F: Pack-out — carton, padding, label, stack plan
This sounds formal, but it saves time. It also prevents the classic mistake: building 10 sets beautifully, then rushing the last 20.
The item map: one sketch that saves hours
An item map is a simple overhead sketch: where the anchor goes, which side the boxes sit on, where the small items fill. Tape that sketch at Station D.
Also, standardize label direction. Decide which face points forward, then keep it consistent. A small rule like “all front labels face the handle side” removes guesswork mid-build.
Building 30 sets: speed without chaos
Thirty sets can be built in a few hours with two people if preparation is done first.
Pre-fold all liners the same way
Pre-make tissue blocks (around 90 blocks for 30 sets)
Use a measured filler depth (same hand scoop each time)
Place anchors first across all baskets, then add medium items, then small items
Finish with ribbon and tags only after every basket is fully filled
That last step is important. Ribbon early on gets crushed and wrinkled as baskets move around the workspace.
Building 80 sets: consistency becomes the main job
At 80 sets, the build starts to drift unless rules are strict.
Assign one person to liners and structure only
Assign one person to layout only
Run QC every 10 baskets: height check, label check, carry check
Keep a “perfect sample” basket at the station as a visual reference
Refill filler containers at set intervals so scoop sizes don’t change
A small but real issue shows up at this volume: fatigue. Hands start to pack faster, and filler starts to get heavier. Measuring filler depth with a marked line inside the basket helps keep builds uniform.
Building 200 sets: treat it like production
Two hundred sets is a production run. It needs batching inside the batch.
Split the build into groups of 25 sets
Complete each group fully, including finish and pack-out
Photograph the first approved sample and keep it visible
Track consumables (liner sheets, ribbon rolls, filler bags) to avoid mid-run substitutions
Use carton packing rules: same number of baskets per carton, same orientation, same padding
This is also where a carry-angle test becomes non-negotiable. Pick one basket from each group of 25, lift it by the handle, walk 10 meters, set it down, and check if anything moved.
QC checklist that catches the ugly surprises
QC should be fast and visual. A clipboard helps, but a simple checklist works.
Base is flat; basket doesn’t rock
Anchor item is braced; no tilt
Weight feels centered; no pulling to one side
Labels face forward; no sideways branding
Liner rim line is clean; no crumpled edges
Ribbon lies flat; tag doesn’t flip easily
No sticky residue; no fingerprints on bottles
If a project needs a custom card, logo ribbon, or a consistent brand color, it’s easier when customization is planned early. That’s why many projects start by reviewing Customization options before the item list gets locked.
Budget tiers that still look intentional (Budget / Mid / Premium)
Budget doesn’t decide whether a basket looks good. Editing decides that. Fewer items placed well often looks better than many items packed tightly.
Below are three complete example builds. Each one includes a content list, a layout plan, and the reason the pairing works.
Budget tier: clean, compact, and practical
Theme: “Small comfort break”Basket size: small or low-profileContents (example list)
1 tea tin or sachet pack
1 snack bar or biscuit pack
1 mini candle or small diffuser stone
1 hand cream (travel size)
1 note card
LayoutPlace the hand cream at the back as the anchor. Set the tea tin in the middle. Lay the snack pack across the front edge. Tuck the mini candle near the side as a visual accent. Slide the note card behind the anchor so it peeks out.
Why it worksThis build avoids “tiny clutter.” Each item has a clear spot, and the set feels complete without filler overload.
Mid tier: balanced variety with better structure
Theme: “Welcome and unwind”Basket size: medium-depthContents (example list)
1 bottle (sparkling water, juice, or non-alcoholic beverage)
1 boxed sweets item
1 savory snack (nuts or crackers)
1 jar (honey or jam)
1 scented soap or lotion
1 small textile (face towel or napkin)
1 card
LayoutSeat the bottle slightly off-center in the back row and brace it with tissue blocks. Put the boxed sweets beside it to form a stable wall. Place the jar in front of the box, low and centered. Add the soap/lotion to the opposite side for balance. Fold the textile into a tight rectangle and tuck it behind the jar as a soft background. Finish with the card behind the bottle.
Why it worksThe mix feels generous without being random. The bottle gives height, the jar gives weight, and the box gives structure.
Premium tier: a full hamper that looks calm
Theme: “Celebration hamper”Basket size: large hamper or deep basketContents (example list)
1–2 tall anchors (bottle or tall boxed item)
2 larger boxed food items
2 jars (spread, honey, or preserves)
2–3 snack packs (sweet + savory mix)
1 high-quality candle or home fragrance piece
1 printed card or booklet
LayoutBuild a reinforced base: baseboard + non-slip + liner. Place the tall anchors at the back, slightly separated. Use the larger boxes as the middle “wall” to lock the back row. Set jars low and centered, one on each side of the front. Use snack packs to fill shallow gaps, but keep the front edge clean. Add the candle as a focal point near the center, not in a corner.
Why it worksThis hamper looks full without looking crowded. The structure items (boxes) do the work, and filler stays hidden.
A compact, color-led set that reads “gift” immediately
Color consistency makes budget builds look premium. A single palette, repeated 3–5 times, creates the feeling of design.

Even with small items, the build feels stable because tall pieces sit in back and the front edge stays clean.
Common mistakes & quick fixes (the real “save it in 2 minutes” list)
Mistakes happen. The goal is fast fixes that don’t require rebuilding the whole basket.
Bottle gets squeezed by the handle
This is common in handled baskets with tall bottles. The handle arc presses inward, and the bottle label gets scuffed.
Quick fix: rotate the bottle 10–20 degrees and shift it away from the handle line. Add a tissue block between bottle and handle sidewall as a brace.
Labels look messy or face different directions
A table of gifts looks chaotic when labels spin randomly. Photos exaggerate it.
Quick fix: pick one front direction and commit. If time is tight, at least align the front row items so the first view looks clean.
Filler is too high and looks cheap
Overfilled shred is the easiest way to make a gift look like a last-minute craft project.
Quick fix: remove filler until the liner rim line shows. Replace loose shred with hidden tissue blocks under items to keep height without the “fluffy” look.
Heavy items sit at the edge and the basket tips
This shows up when jars sit on outer corners. A gentle bump on a table can tip the whole set.
Quick fix: move heavy items inward and lower. Add a baseboard if the base flexes. Use two medium items as side supports to lock weight into the center.
Wind flips tags and cards on outdoor tables
Outdoor setups love to humiliate tags. One gust and the whole table looks messy.
Quick fix: use a tiny adhesive dot under the lower corner of tags. For cards, tuck the bottom 1–2 cm behind a box so the card can’t lift.
Ribbon looks wrinkled after transport
Ribbon that’s tied early gets crushed during packing and staging.
Quick fix: transport with ribbon untied but pre-cut and pre-looped. Tie the final bow at the venue in under 20 seconds per basket.
The basket looks empty even with good items
This usually means the “skyline” is flat. Everything sits at the same height.
Quick fix: add height with hidden risers. A small empty box under the liner can lift the back row and create depth instantly.
Mini case stories (short, practical, and very normal)
These aren’t dramatic stories. They’re the kind of small projects that show where baskets shine—and where details matter.
Case 1: Wedding welcome table, 60 sets, one afternoon build
A welcome table needs gifts to look consistent in a row. The build plan here is boring on purpose: same basket size, same liner fold, same tag placement. One “approved sample” sits at the station like a reference photo.
For speed, all anchors (water bottle + boxed snack) get placed first across all 60 baskets. Then jars go in, then small items, then tags at the very end. The carry test is simple: pick one basket from every 10, walk across the room, and check for tilt.
Case 2: Hotel room drop-ins, 80 sets, tight staging window
Room drops are all about quiet presentation. Gifts get placed on desks, side tables, or luggage benches, often under warm lighting. A medium-depth room-drop basket works because the contents sit low and tidy.
The detail that saves time is labeling. A small card tucked behind the back row shows room number without messing up the front view. After that, baskets get grouped by floor in rolling carts, usually 10–12 per cart, so placement stays fast.
Case 3: Conference speaker gifts, 30 sets, fast handoff backstage
Speaker gifts get handled quickly. They need to be easy to carry with one hand while holding a badge or a phone in the other. Small baskets work better than boxes because they have a natural grip point and don’t need a lid.
The stability trick is bracing the tallest item. Even a travel-size bottle can tip if it sits on loose shred. A folded tissue block behind it locks it in place, and a neat ribbon band finishes the set without needing extra packaging.
Choosing the right basket: what to check before committing
Choosing a basket for gifting is less about trends and more about behavior. A basket should sit flat, carry cleanly, and hold shape under load.
Rim strength and base flatness
Press lightly on the rim. A sturdy rim resists flexing. Set the basket on a flat surface and tap the corners. If it rocks, that wobble will show on a display table.
Also, check the base weave. A flat base is easier to reinforce with a baseboard. A rounded base can still work, but it requires more filler to level items.
Handle joins and carry angle
Handles fail where they join the rim. Lift the empty basket by the handle and watch the join points. If the handle pulls inward hard, tall items will get squeezed unless they’re placed away from the handle arc.
A quick habit is to test the “carry angle.” Tilt the basket slightly while holding it. If items slide toward one side, the base needs more grip and structure.
Material and finish: keep it honest
A woven bamboo basket should feel clean in the hand, not scratchy or brittle. Tight, even weaving reads more refined under event lighting. Rough or uneven edges can catch ribbon and snag tissue during build.
For projects where a branded look matters, a consistent finish helps. That’s also where a supplier with manufacturing control—like Goldwoven—can reduce variation across a batch.
Bamboo hamper basket transport and staging (without the panic)
Transport is where good builds get ruined. The solution is to pack baskets like fragile décor, not like groceries.
Packing rules that protect shape
Line cartons with padding. Place baskets in consistent orientation. Avoid stacking heavy items on handles.
For hamper baskets, keep the front edge facing the same direction in the carton. That way, the “photo side” doesn’t rub against other baskets during transit.
On-site staging that looks organized
Staging goes faster when baskets are grouped. Group by table, floor, or handoff point, then place groups in blocks of 6–10.
Also, keep one “hero” basket at the front of each block. That basket becomes the visual reference for straightening tags and aligning labels quickly.
Quick resets right before the doors open
Ten minutes before doors open, small problems show up: a tag flips, a ribbon droops, a jar label turns sideways.
A fast reset kit helps:
small scissors
adhesive dots
extra ribbon
a lint-free cloth
a handful of tissue blocks
That kit fixes most issues without rebuilding.
FAQ: bamboo basket for gift packaging and event gifting
Is a bamboo gift basket suitable for formal events?
Yes, when the build stays restrained. A neat liner fold, calm palette, and one finishing detail reads more formal than heavy wrapping.
How can glass jars be packed safely?
Glass needs a stable base and spacing. A baseboard plus non-slip layer prevents sliding. A paper ring or divider keeps jars from knocking into each other.
Do baskets work for outdoor events?
They do, but wind needs planning. Secure tags with a small adhesive dot. Use a sleeve or lid if the event has strong breeze or dusty conditions.
What keeps a batch of baskets looking identical?
Consistency comes from pre-folded liners, measured filler depth, and a fixed item map. A single approved sample basket also prevents drift during long builds.
Can a woven bamboo basket ship well?
It can, as long as the carton packing protects shape. Padding, consistent orientation, and braced contents are the difference between “arrives perfect” and “arrives tilted.”
What makes a basket look expensive without expensive items?
Editing. Fewer items placed cleanly beats many items shoved in. A controlled liner rim line and stable skyline do most of the work.
Wrap-up: what to do next
A basket works for gifting when it behaves like packaging first and décor second. Stability, repeatability, and clean presentation matter more than fancy extras. When those basics are handled, the same build can move from a welcome table to a hotel room drop to a speaker handoff without looking out of place.
Next steps that keep things simple:
Build one full sample, run a 10-meter carry test, then adjust bracing and grip layers.
Pick one liner fold and one item map, then stick to them for the entire batch.
Choose a basket shape that matches the handoff: handled for handoffs, low trays for staging, deeper hampers for premium sets.
For event-ready formats, browsing the Gift baskets collection is a practical way to compare shapes quickly. For branded work, the Customization options page helps set expectations early. And when the goal is a reliable container that looks good the moment it lands, a bamboo basket is still the easiest place to start.